Editing user rights is essential for managing user access, and permissions, ensuring the right level of control over various functionalities within your project. Here's a step-by-step guide on how to edit user rights, based on the provided interface:
Access the digiQC Web App
Go to app.digiqc.com.
Navigate to the Project
Under the "User" tab, find the selected user’s name.
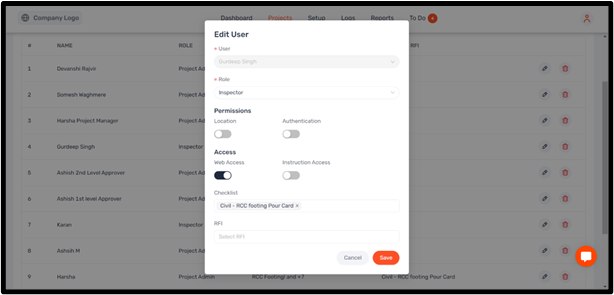
Change User Role
Use the "Role" dropdown to modify the user’s role (e.g., Inspector, Project Admin, Approver). Choose the role based on their responsibilities.
Project Permissions:
Location: Enable this toggle if you want the user to access the mobile app only within the project radius.
Authentication: Turn this on if you require the user to unlock their mobile device each time they start an inspection.
Web Access: Toggle this to grant the user permission to review the project, monitor progress, and download PDF reports.
Instruction Access: Enable this if you want the user to raise site issues and observations.
Checklist Access:
Under the Checklist field, you can assign specific checklists that the user can view and operate. For instance, in this case, the user has access to the Civil - RCC Footing Pour Card checklist. You can add or remove checklists by clicking on the field and selecting from the available options.
RFI
You can assign specific RFIs to the user by selecting an option from the RFI dropdown list. This allows the user to access and manage particular RFIs related to the project.
Save the Changes:
Once you have modified the necessary fields, click the Save button at the bottom of the pop-up window to apply the changes.
After saving, the user’s rights and access levels will be updated based on the modifications made.